
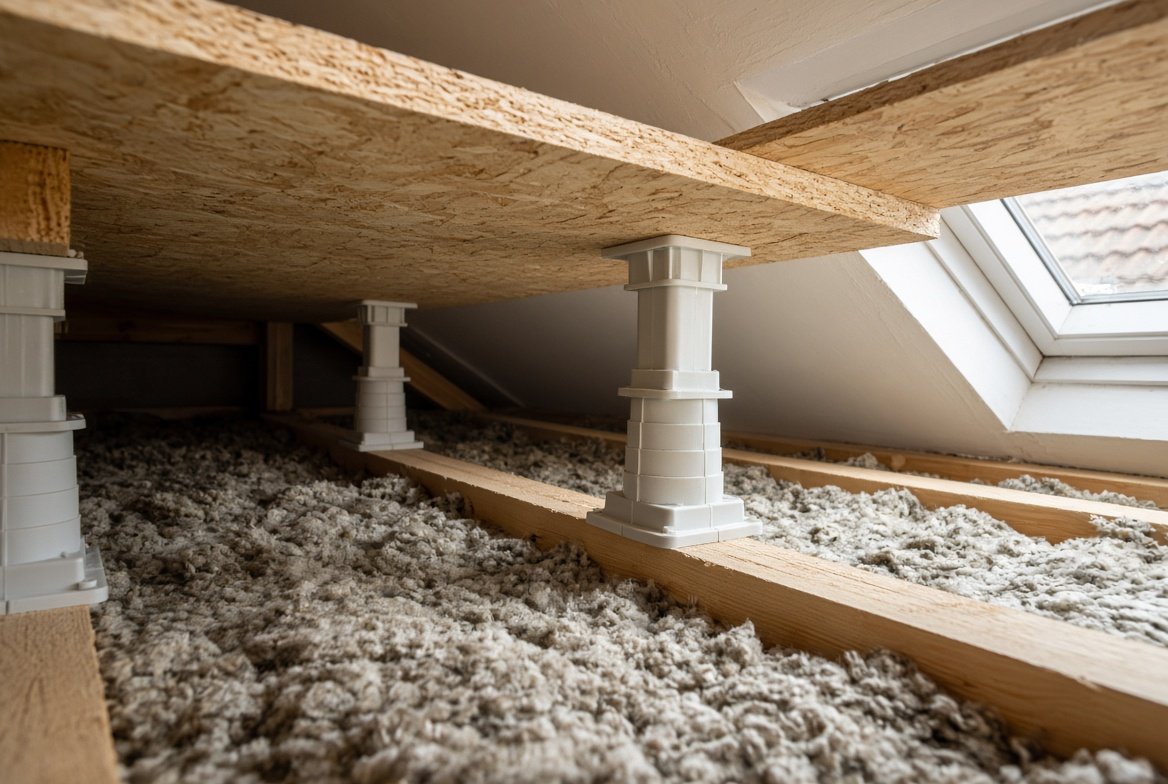
If you want to use your loft for storage without squashing the insulation, loft legs are the standard answer. They are small plastic or metal supports that sit on the ceiling joists and lift the boards clear of the insulation, so you keep the thermal performance you paid for and the roof space keeps breathing. They are cheap and easy to fit, but choosing the wrong height, spacing them too far apart or fixing them badly causes sagging boards and compressed insulation. This guide explains what loft legs are, how to choose the right height, how many you need, how to fit them and what they cost. It is a companion to our wider guide on how to board a loft.
What Are Loft Legs?
Loft legs, sometimes called loft stilts or loft flooring legs, are risers that fix to the top of the ceiling joists and hold the loft boards at a set height above them. They are usually made from strong recycled plastic, though metal versions exist. Each leg has a wide base that screws to the joist and a flat top that carries the board. They spread the load across several joists and keep the boards off the insulation. They are sold in boxes, commonly of 12, and in a range of heights.
Why Not Board Directly on the Joists?
Laying boards straight onto the joists squashes the insulation, or forces you to leave it thin, because most ceiling joists are only around 100 to 150 mm deep and modern insulation is around 270 mm. Compressed insulation does not work properly, which means more heat loss and higher heating bills. Loft legs raise the boards so the insulation can sit at full depth above the joists, with a small air gap beneath the board to reduce condensation risk.
Loft Leg Heights
| Height | Typical use | Notes |
|---|---|---|
| About 100 mm | Shallow insulation above the joists | Check that it still gives the depth you need |
| About 175 mm | Most common size, for joists around 100 mm deep and 270 mm of insulation | The standard choice in many UK lofts |
| About 270 mm | Deeper insulation above the joists | For thicker top-ups |
| About 300 mm (XL) | Very deep insulation or high-performance upgrades | Reduces headroom, so check clearance |
How to Choose the Right Height
The leg height is measured from the top of the joist, so it needs to match the depth of insulation above the joists plus a small air gap. As an illustration, if your joists are about 100 mm deep and you want 270 mm of insulation in total, there will be about 170 mm of insulation above the joist tops, so a 175 mm leg leaves a small gap. If your joists are deeper, you may need less leg height, and if you plan to go beyond 270 mm, you will need taller legs. Check the headroom as well, because the higher the board, the less space you have for storage. Measure your actual joist depth before you buy, and check the maker’s guidance.
Want a number specific to your roof?
Get matched with local roofers for a free, no obligation quote.
How Many Loft Legs Do You Need?
The number depends on the joist spacing, the board size and the layout. As a general guide, many makers advise a maximum of about 600 mm between legs along the joist, with each board supported at several points. Rough figures often quoted are:
- Joists at 400 mm centres: roughly 6 to 8 legs per square metre of boarding.
- Joists at 600 mm centres: roughly 4 to 6 legs per square metre.
As an example, a 10 m² boarded area could need somewhere in the region of 50 to 100 legs, depending on the layout and board size. Legs come in boxes of 12, so round up and buy a few spare. Many suppliers offer a calculator, and the manufacturer’s spacing table is the safest guide.
Boards to Use With Loft Legs
- 2,400 by 600 mm tongue and groove chipboard, 18 mm thick: the most common choice, usually moisture-resistant P5 grade. It needs a large loft hatch and enough headroom to handle.
- 1,200 by 320 mm boards: smaller and easier to get through a hatch, often sold in packs.
- OSB boards: a stronger alternative, in a similar thickness.
Tongue and groove edges lock the boards together and reduce movement. Make sure the boards will physically fit through your loft hatch, and allow for waste, commonly around 10 to 15 percent for cuts.
Screws and Fixings
Most loft legs are fixed with 4 mm by 30 mm countersunk screws. Many legs have pilot holes, so you do not need to pre-drill. As a rough guide, you need about four screws per leg base to fix it to the joist, plus two to four more to fix the board to the leg, which works out at around 70 to 100 screws per box of 12. Always follow the manufacturer’s instructions on screw size and number.
How to Fit Loft Legs
This is an overview, and the maker’s instructions come first. Before you start, check the roof for damp and rot, and make sure the insulation is topped up to the depth you want, because it is hard to add afterwards.
- Plan the layout. Mark where each board will go, starting from the hatch, and avoid the eaves, water tank, recessed downlights and electrical junction boxes.
- Top up the insulation. Fit insulation between and over the joists to the depth you need, keeping it clear of the eaves.
- Mark the leg positions. Mark each joist where a leg will sit, using the spacing guide.
- Fix the legs. Screw each leg firmly to the top of the joist, making sure the base is flat and the top is level.
- Check the height. Lay a straight edge or string line across the legs to make sure the tops are even.
- Lay the first board. Start at the hatch end, with the tongue facing the next board, and screw it to the legs.
- Continue laying boards. Stagger the end joints brick-bond fashion so each end lands on a leg, and keep the eaves clear.
- Check and tidy. Look for loose screws, gaps and trapped cables.
Keep the eaves open so air can enter the roof space. Our roof ventilation guide explains why, and the notes on cold roof construction show how the airflow should work.
Common Mistakes
- Legs too short, so the board still presses on the insulation.
- Legs too far apart, so the board flexes and the legs can tip.
- Fixing into plasterboard instead of joists.
- Placing legs on the edge of a joist, where the base can split or twist.
- Board joints that do not land on a leg, leaving unsupported ends.
- Blocking the eaves with boards or insulation.
- Overloading, by storing heavy items on a platform meant for light use.
- Boarding over cables, junction boxes or downlights that need access and ventilation.
How Much Weight Can Loft Legs Take?
Some makers quote high load ratings for individual legs, in the hundreds of kilograms, but the limiting factor is the ceiling joists, which are normally designed to carry a ceiling and insulation, not heavy storage. Many makers advise keeping storage light, with figures in the region of 50 kg per square metre quoted, so follow the instructions for your product. Do not store heavy furniture, filing cabinets, water tanks or anything that could overload the ceiling below. For heavy storage or a room conversion, ask a structural engineer or building control. Our guide to roof timbers explains how to check the joists first, and our article on attic vs loft explains how these spaces are used and described.
Alternatives to Loft Legs
- Raised timber battens or bearers fixed across the joists, which can carry boards above the insulation.
- Ready-made platform kits, which combine panels and supports.
- A walkway only, which is a narrow raised path from the hatch to the tank or a storage corner.
- Not boarding at all, and keeping the insulation fully deep and undisturbed.
Loft Leg Cost in the UK
Prices vary, so treat these as general guides based on 2026 UK price guides.
| Item | Typical cost | Notes |
|---|---|---|
| Single loft leg | Roughly £1.30 to £2 | Taller legs cost a little more |
| Box of 12 loft legs | Roughly £16 to £25 | Standard retail pack |
| Legs for a 10 m² area | About £70 to £180 | Depends on joist spacing and layout |
| Loft boards, per board | Roughly £10 to £25 | Varies by thickness and type |
| Legs and boarding, fitted | Roughly £40 to £65 per m² | Higher if insulation needs topping up |
Safety and Asbestos
Working at height is dangerous. Falls through ceilings are a real risk. Step only on joists or boards, never on the plasterboard between them, and use a stable ladder for the hatch. Wear gloves, a mask and eye protection when handling insulation, and take a torch or head torch.
Asbestos warning. Some older lofts contain loose vermiculite insulation, pipe lagging, textured coatings or boards that may contain asbestos. Do not disturb them, and have suspect materials identified by a competent surveyor. The HSE asbestos guidance explains the rules.
Frequently Asked Questions
What are loft legs?
Plastic or metal risers fixed to the ceiling joists that hold loft boards above the insulation, so the insulation is not squashed.
What height loft legs do I need?
Enough to clear the insulation above your joists plus a small gap. 175 mm is the most common size, with taller legs for deeper insulation.
How many loft legs do I need?
Roughly 4 to 8 per square metre depending on joist spacing, with no more than about 600 mm between legs. Check the manufacturer’s calculator.
Can I use loft legs without topping up the insulation?
You can, but it is better to top up first, because it is hard to add insulation once the boards are down.
How much weight can a loft hold on legs?
The legs are strong, but the ceiling joists limit the load. Treat it as light storage, and ask a structural engineer before storing heavy items.
Do I need building regulations approval for loft legs?
Boarding a loft for light storage does not normally need it, but converting the loft to a room does. Check with building control if you are unsure.
Final Thoughts
Loft legs are a cheap, simple way to get storage space without wasting heat. Choose a height that clears the insulation, space the legs as the maker advises, fix them into the joists and keep the eaves clear. Stay on the joists, keep the load light and treat any old loft materials as asbestos until they have been checked.
Get a professional assessment
If you are unsure how much life your current roof has left, a local roofer can give you an honest assessment as part of a free inspection. Browse vetted roofers through our roofer directory, or get a quick replacement estimate using our free cost calculator.